Contact forms are used to provide a way for a customer to easily get in contact with you through a form on the page which sends an email.
Contact Plugin
Adding the plugin:
To add a new plugin to a page, select the "+" (General Plugins) menu.
Locate the Contact plugin and drag and drop it onto the page, into whichever content block you would like it.
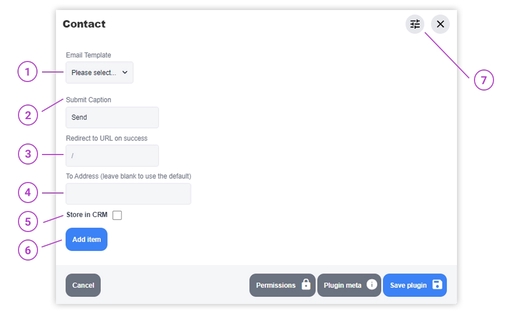
Once you have done this, the Contact Form Modal will pop up - which provides you with the ability to add fields to your contact form.
Setting up the plugin:
- Email Template - select the email template that you would like to use on the contact form - this will usually be the "Contact Form Email", as by default this is set up to forward all information from a contact form. It may differ depending on what you are using the form for and if you need the information being collected or not.
- Submit caption - This is the text that shows in the button to send the form once the user has filled it out.
- Redirect to URL on success - you can choose to redirect to the same page they are currently on by leaving this empty, or you can add in a different page if you want the user to end up on a success page or a different related page.
- To Address - By default, the "To Address" is the one that is defined in the Config; if you want this to be a different address, you can enter it here. You can separate these addresses with semi colons if you want multiple.
- Store in CRM - Advanced functionality for clients using Jolojo CRM (not publically available)
- Add item - use this to add new items to the contact form. Select the type using the dropdown, define what the label of the field will be in the Label field and if you want to show some text in the box before the user enters any data, add placeholder text. You can also use the required checkbox to define whether or not the user has to enter data into the field or not.
- Advanced Settings - selecting the advanced settings provides a Campaign Monitor List Key and Mailchimp List Key; which allows you to enter keys for either of these integrations in which the emails will be added to.